How to Read an Sd Card With Atmega328
Every once in a while you lot come up across an idea, where you demand for a way to store large corporeality of log data and other information for your Arduino projection, for example a GPS logger.
The solution is to use what'south plant in every digital photographic camera and mp3 player: Flash Cards! often chosen SD or micro SD cards. Their power to pack GigaBytes of information into a space smaller than a coin made them indispensable affair in our life.
Hardware Overview
The micro SD card module contains two principal components that go far undoubtedly like shooting fish in a barrel to add data logging to your adjacent Arduino project:
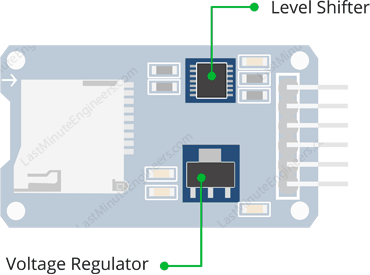
- The operating voltage of whatsoever standard micro SD Cards is 3.three V. Then we cannot directly connect it to circuits that use 5V logic. In fact, any voltages exceeding iii.6V will permanently impairment the micro SD card. That's why; the module has an onboard ultra-depression dropout regulator that will convert voltages from 3.3V – 6V down to ~3.3V.
- There'southward also a 74LVC125A chip on the module which converts the interface logic from three.3V-5V to 3.3V. This is called logic level shifting. That ways you tin can utilise this board to interact with both three.3V and 5V microcontrollers similar Arduino.
There are really two ways to interface with micro SD cards – SPI mode and SDIO mode. SDIO mode is mode faster and is used in mobile phones, digital cameras etc. But it is more than complex and requires signing non-disclosure documents. For that reason, hobbyist similar us volition probable never come across SDIO fashion interface code. Instead, every SD bill of fare module is based on 'lower speed & less overhead' SPI mode that is easy for whatsoever microcontroller to use.
Micro SD Card Module Pinout
The micro SD card module is adequately simple to connect. It has half dozen pins:
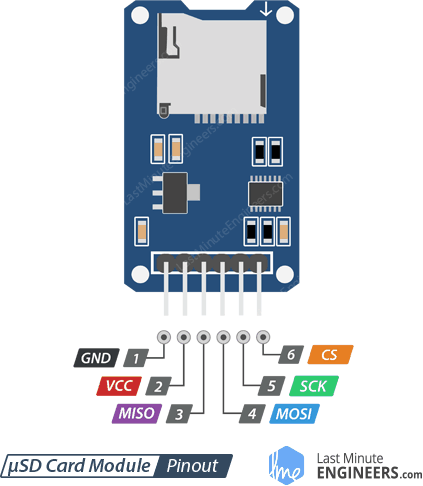
VCC pin supplies ability for the module and should be connected to 5V pin on the Arduino.
GND should be connected to the basis of Arduino.
MISO (Master In Slave Out) is SPI output from the Micro SD Card Module.
MOSI (Principal Out Slave In) is SPI input to the Micro SD Card Module.
SCK (Serial Clock) pin accepts clock pulses which synchronize information transmission generated by Arduino.
SS (Slave Select) pivot is used by Arduino(Principal) to enable and disable specific devices on SPI bus.
Preparing the micro SD card
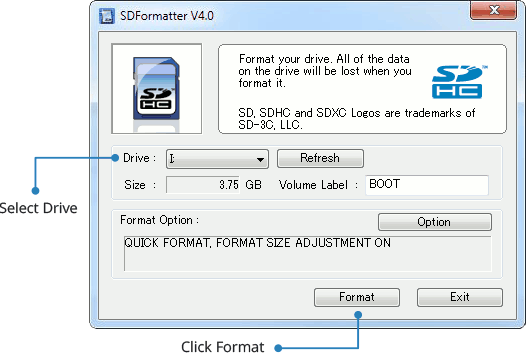
Before you insert the micro SD card into the module and hook it upward to the Arduino, you must properly format the carte. For the Arduino library nosotros'll be discussing, and nearly every other SD library, the card must be formatted FAT16 or FAT32.
If you take a new SD carte du jour, chances are it's already pre-formatted with a FAT file organization. Nonetheless y'all may take problems with how the factory formats the card, or if information technology'south an old card it needs to exist reformatted. Either mode, it's always skillful thought to format the card before using, even if it's new!
Nosotros strongly recommend you use the official SD card formatter utility – written past the SD association it solves many problems that come with bad formatting! Download the formatter and run it on your computer, just select the right drive and click FORMAT.
Wiring – Connecting Micro SD Card Module to Arduino
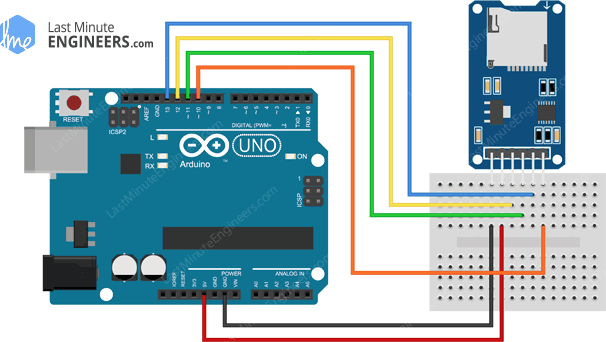
At present that your card is gear up to employ, we can wire up the micro SD breakout board!
To start with, insert the micro SD card module into the breadboard. Connect VCC pin on the module to 5V on the Arduino and GND pin to ground. Now we are remaining with the pins that are used for SPI communication.
As micro SD cards require a lot of information transfer, they will give the all-time performance when connected up to the hardware SPI pins on a microcontroller. The hardware SPI pins are much faster than 'bit-banging' the interface code using another set of pins.
Note that each Arduino Board has different SPI pins which should be connected accordingly. For Arduino boards such as the UNO/Nano those pins are digital 13 (SCK), 12 (MISO) and 11 (MOSI). You will also need a fourth pivot for the 'chip/slave select' (SS) line. Unremarkably this is pivot 10 but yous can actually use any pin you similar.
If you take a Mega, the pins are different! You'll desire to use digital 50 (MISO), 51 (MOSI), 52 (SCK), and 53 (SS). Refer below table for quick understanding.
In case you're using different Arduino lath than mentioned in a higher place, it is advisable to cheque the Arduino official documentation earlier proceeding.
That'south information technology! Nosotros are now fix to log some data!
Arduino Code – Testing the SD card module with CardInfo
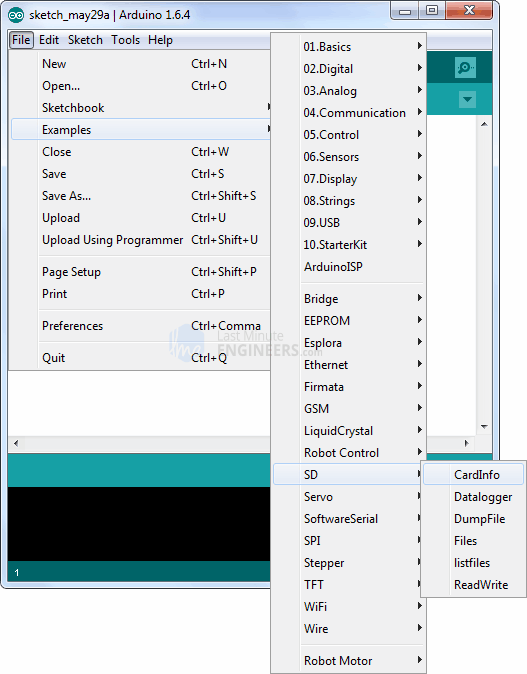
Communicating with an SD carte is a bunch of work, only luckily for us, Arduino IDE already contains a very dainty library called SD which simplifies reading from and writing to SD cards. You can meet it in the Examples submenu.
Side by side, select the CardInfo instance sketch.
This sketch volition non write any data to the card. It just tells yous if it managed to recognize the card, and displays some information about it. This tin can be very useful when trying to figure out whether an SD card is supported. Before trying out any new card, nosotros recommend you to run this sketch once!
Go to the get-go of the sketch and make sure that the chipSelect line is correctly initialized, in our case we're using digital pin #10 so change information technology to x!
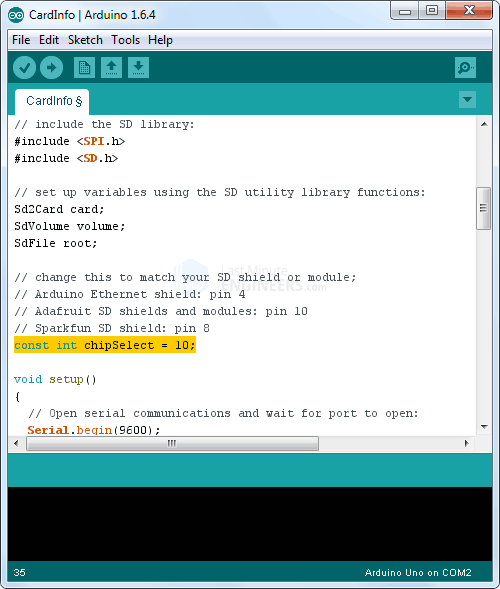
OK, now insert the SD card into the module and upload the sketch.
As shortly as you open the Serial Monitor, yous'll probably get something similar the following:
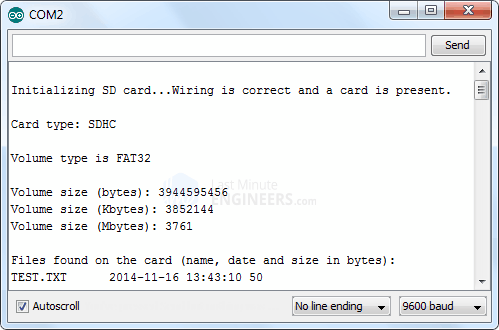
You may find it gibberish, just information technology's useful to run across the menu blazon is SDHC (SD High Capacity), Volume type is FAT32 as well as the size of the card almost 4 GB etc.
If you have a bad card, which seems to happen more with clone versions, you might see:
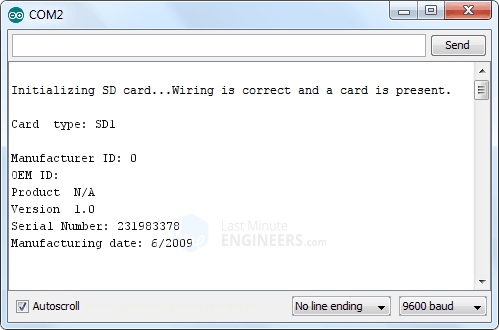
The card mostly responded, but the data is all bad. Come across in that location is no Manufacturer ID / OEM ID and the Product ID is 'N/A'. This shows that the card returned some SD errors. Information technology's basically a bad scene. If you go something like this, you can endeavour to reformat it or if information technology notwithstanding flakes out, yous should toss the card.
Finally, try taking out the SD card and running the sketch again, you'll get the post-obit,
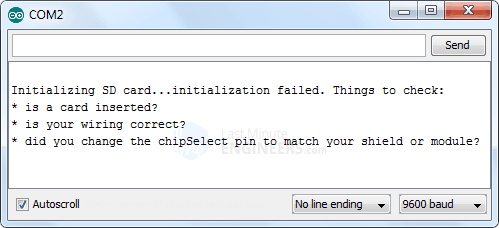
Come across, it couldn't fifty-fifty initialize the SD carte. This can as well happen if there's a wiring error or if the bill of fare is permanently damaged.
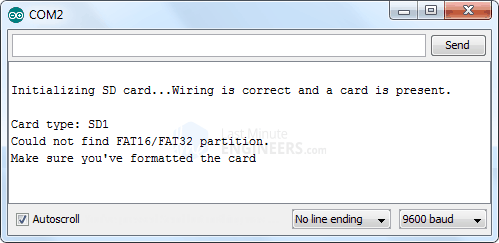
If the wiring is correct but the SD card is not properly formatted, you'll get something similar this:
Arduino Code – Reading and Writing Information
Considering y'all have successfully initialized the SD card, we'll movement on to our next experiment. The following sketch will do a basic demonstration of writing and reading data from a file. Try the sketch out, earlier we begin its detailed breakdown.
#include <SPI.h> #include <SD.h> File myFile; // change this to match your SD shield or module; const int chipSelect = 10; void setup() { // Open up series communications and wait for port to open: Series.brainstorm(9600); while (!Series) { ; // wait for serial port to connect. Needed for Leonardo only } Serial.print("Initializing SD card..."); if (!SD.begin()) { Serial.println("initialization failed!"); return; } Serial.println("initialization done."); // open up the file. note that only one file tin can be open at a time, // so you have to shut this one before opening some other. myFile = SD.open up("test.txt", FILE_WRITE); // if the file opened okay, write to it: if (myFile) { Serial.print("Writing to examination.txt..."); myFile.println("testing 1, two, 3."); // close the file: myFile.close(); Serial.println("done."); } else { // if the file didn't open, print an error: Series.println("error opening test.txt"); } // re-open the file for reading: myFile = SD.open("exam.txt"); if (myFile) { Serial.println("test.txt:"); // read from the file until there's nil else in it: while (myFile.available()) { Serial.write(myFile.read()); } // shut the file: myFile.close(); } else { // if the file didn't open, print an mistake: Serial.println("error opening test.txt"); } } void loop() { // nothing happens after setup } One the code is uploaded, if everything is ok, the following will appear on the series monitor.
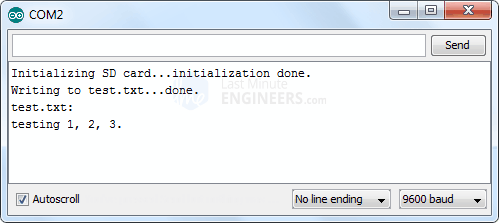
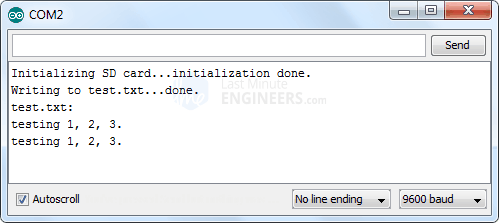
If you reset your Arduino and permit the sketch run again; the new information written gets appended to the file without overwriting previous data.
Code Explanation:
The sketch starts with including the built in SD library and the SPI library which allows us to easily communicate with the SD carte du jour over SPI interface.
#include <SPI.h> #include <SD.h> After the libraries have been included, the next affair we do is declare the Arduino pin to which the chipSelect (CS) pin of the SD card module is connected. The CS pivot is the only one that is non really fixed as any of the Arduino digital pin. We don't demand to declare other SPI pins since we are using hardware SPI interface and these pins are already declared in the SPI library. After declaring the pin, we then create an object myFile, which will be used later on to shop information on the SD card.
const int chipSelect = 10; File myFile; Next, in the setup() section: We start the serial communication for showing the results on the serial monitor. Now, using the SD.begin() role we will initialize the SD card and if initialization is successful the "if" statement becomes truthful and the Cord " initialization done. " gets printed on the series monitor, else the string " initialization failed! " gets printed and the program terminates.
Series.begin(9600); Serial.print("Initializing SD card..."); if (!SD.begin()) { Serial.println("initialization failed!"); return; } Serial.println("initialization done."); Next, the SD.open() office volition open up the file named " test.txt ". In our case, every bit such file is not present, it'll exist created. The other parameter FILE_WRITE opens the file in read-write mode.
myFile = SD.open("examination.txt", FILE_WRITE); In one case the file is opened, we volition print the " Writing to test.txt… " message on the series monitor so using the myFile.println() function we will write the text "testing 1, 2, iii." into the file. Afterward that we need to employ close() office to ensure that the information written to the file is saved.
if (myFile) { Serial.impress("Writing to test.txt..."); myFile.println("testing one, ii, 3."); myFile.shut(); Serial.println("done."); } else { Serial.println("error opening examination.txt"); } Now allow's read the same file to cheque if the write operation was successful.To do that, we volition employ the aforementioned function, SD.open() , only this time equally the file " test.txt " has already been created, the function will but open up the file. Then using the myFile.read() function we volition read from the file and print it on the series monitor. The read() function really reads just one character at a time, and then therefore we need to employ the "while" loop and the office myFile.available() to read all characters in file. At the end we need to close the file.
myFile = SD.open up("examination.txt"); if (myFile) { Serial.println("test.txt:"); while (myFile.available()) { Serial.write(myFile.read()); } myFile.shut(); } else { Serial.println("error opening examination.txt"); } Since this is just a demo sketch to demonstrate how to read and write files, at that place is no signal to run the code multiple times then all the code was placed in the setup() function which runs merely one time, instead of putting it in a loop() function which runs over and over again.
Some things to notation
- You tin can apply
impress()andprintln()functions only like Serial objects, to write strings, variables, etc -
Read()just returns a graphic symbol at a fourth dimension. It does not read a full line or a number! - You must
close()the file(due south) when you're done to make sure all the data is written permanently! This reduces the amount of RAM used. - You can open up files in a directory. For example, if you lot want to open a file in the directory, yous tin call
SD.open("/myfiles/example.txt"). Note that the file path is relative. - The SD card library does not support 'long filenames'. Instead, it uses the iii format for file names, then keep file names curt! For example datalog.txt is fine but "My Sensor log file.text" is non!
- Also proceed in listen that file names practise non take 'case' sensitivity, and so datalog.txt is the aforementioned file every bit DataLog.Txt is the aforementioned file as DATALOG.TXT
Other useful functions in SD Library
Functions used with SD object
There are a few useful functions yous can utilise with SD object. Few of them are listed below:
- If you just want to check if a file exists, use
exists("filename.txt")which will render true or false. - You tin can delete a file by calling
remove("unwanted.txt")be careful! This will really delete it, and in that location'due south no 'Recycle Bin' to pull it out of. - Yous tin create a subdirectory past calling
mkdir("/mynewdir")handy when you desire to stuff files in a location. Nothing happens if it already exists but you tin can always callSD.exists()above showtime.
Functions used with File object
Too, in that location are few functions y'all can use with File objects:
- You can
seek()on a file. This volition move the reading/writing cursor to a new location. For exampleseek(0)will take you to the beginning of the file, which can be very handy! - Too you can phone call
position()which will tell you lot where y'all are in the file. - If yous want to know the size of a file, call
size()to go the number of bytes in the file. - Directories/folders are special files, you can determine if a file is a directory by calling
isDirectory() - Once you have a directory, you lot can outset going through all the files in the directory past calling
openNextFile() - You may end upwardly with needing to know the name of a file, say if y'all chosen
openNextFile()on a directory. In this case, callproper name()which will return a pointer to the viii.3-formatted character array you can directSerial.impress()if you lot want.
Source: https://lastminuteengineers.com/arduino-micro-sd-card-module-tutorial/
0 Response to "How to Read an Sd Card With Atmega328"
Post a Comment